Alexa, ask Microsoft Flow to read out my latest e-mail
[tweet https://twitter.com/that_API_guy/status/1104836878107373570 ]
I posted this on twitter and got a lot of requests to create a blog on this , so here you go -
Why are we doing this?
We are all surrounded by different smart home devices and voice assistants around us. Wouldn’t it be great if we could use them to -
- Add a task to To-Do
- Read email/ send email
- Read out calendar
- Create a meeting invite
- Add an item to SharePoint list and much more…
What do we need?
- Microsoft Flow - If you don’t know what Microsoft Flow is , check out this video from Jon Levesque https://www.youtube.com/watch?v=FOr6wlH5Kgs and sign up for the free trial now!
- Alexa device / Alexa app
- Alexa Developer console account - Here is an overview of the developer console for your reference - https://www.youtube.com/watch?v=q-mrSBrlDso
Concept -

The idea is to create an Alexa Skill that can trigger a Flow when invoked from an Alexa device (like Echo) and send the response back from Flow to the Alexa device so that it can speak/read it out for you.
How will we do this?
Step 1 : Creating an Alexa Skill
Don’t worry if this sounds alien to you. We will go through all the steps as if this was the first time you are creating an Alexa Skill.
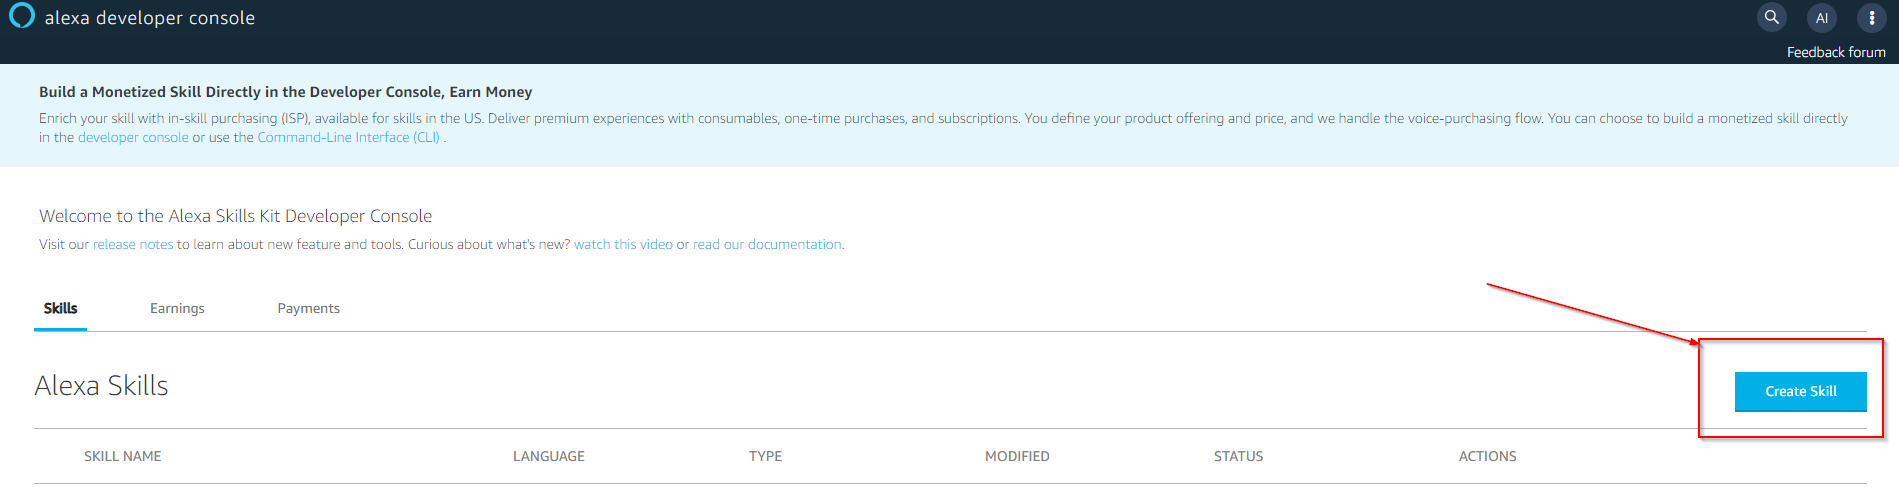
Go to the https://developer.amazon.com/alexa/console/ and sign up for an account. If you already have an amazon account, you can log in with the same credentials.
Click on the “Create Skill” button.
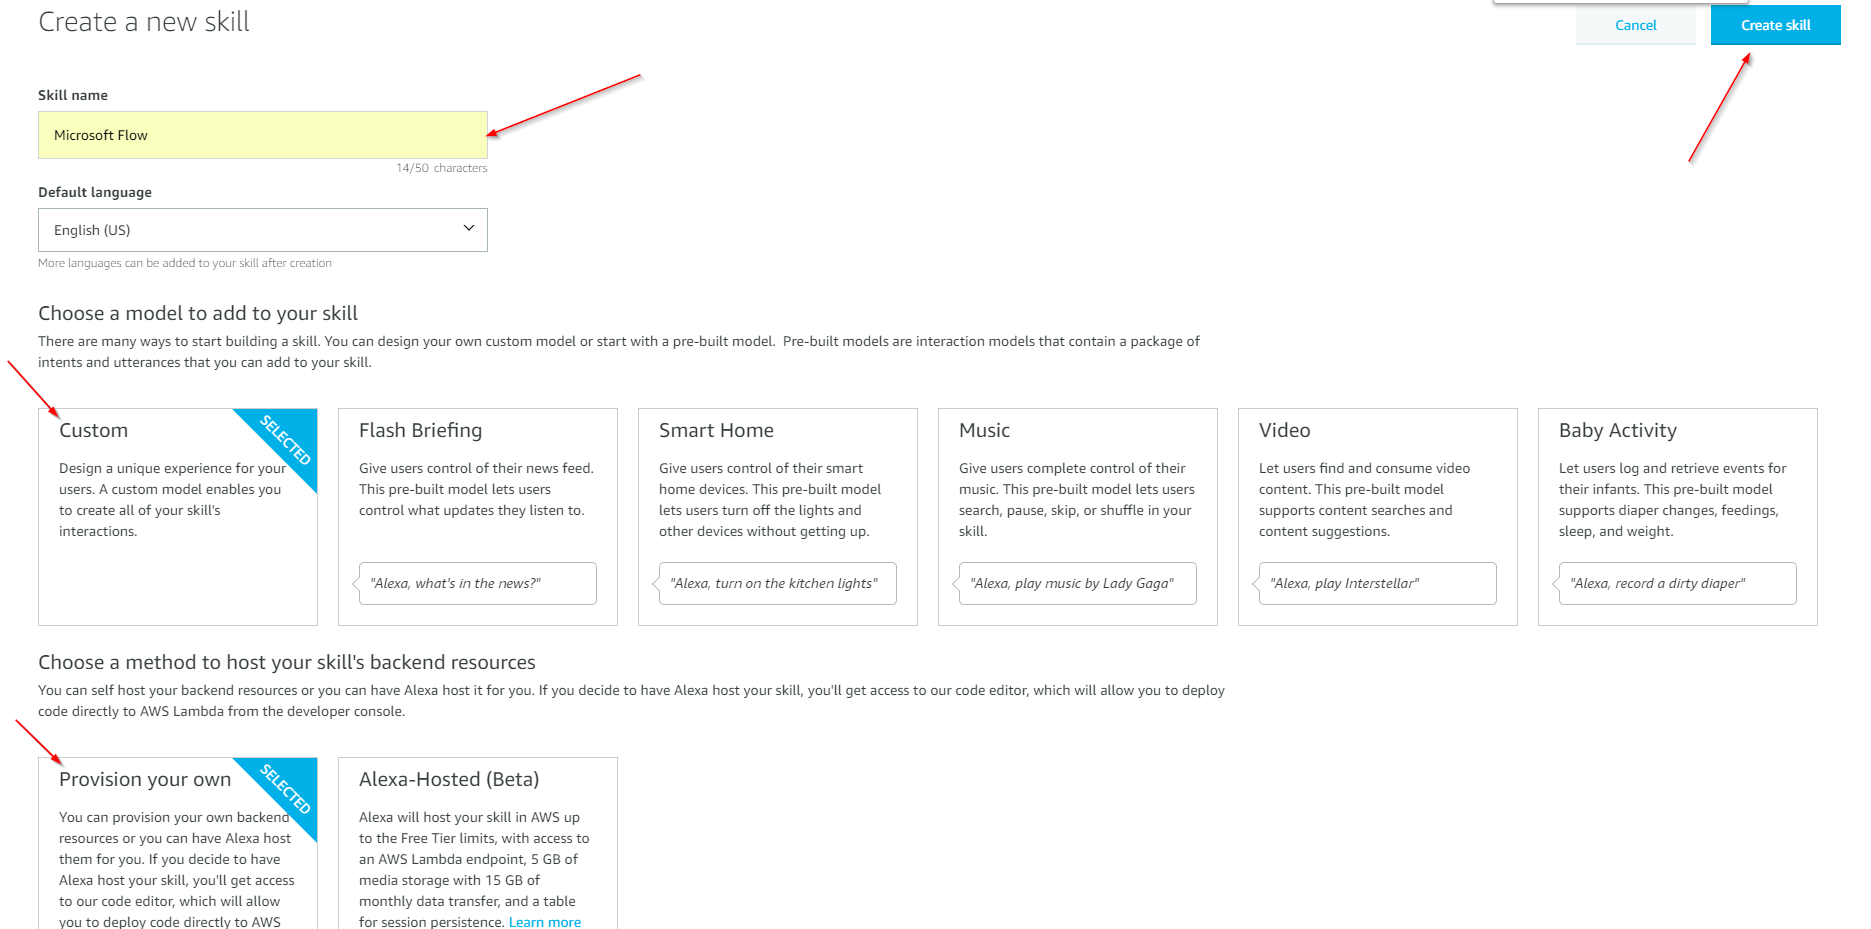
Enter a name for the skill , say “Microsoft Flow” and select the “Custom” model and “Provision your own” method for hosting the skill. Hit the “Create Skill” button.
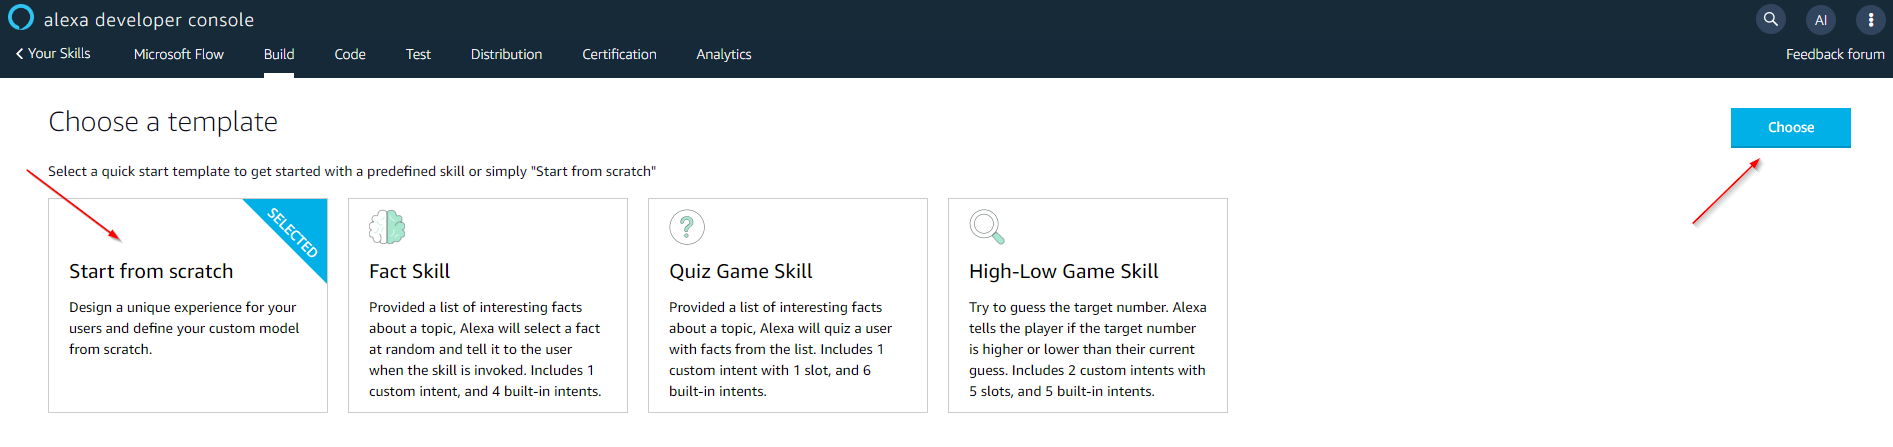
Choose the “Start from scratch” template and click on the “Choose” button. If you want to learn more about Alexa skills, you can choose the other templates to understand how they work.
You will see this dashboard on your screen -
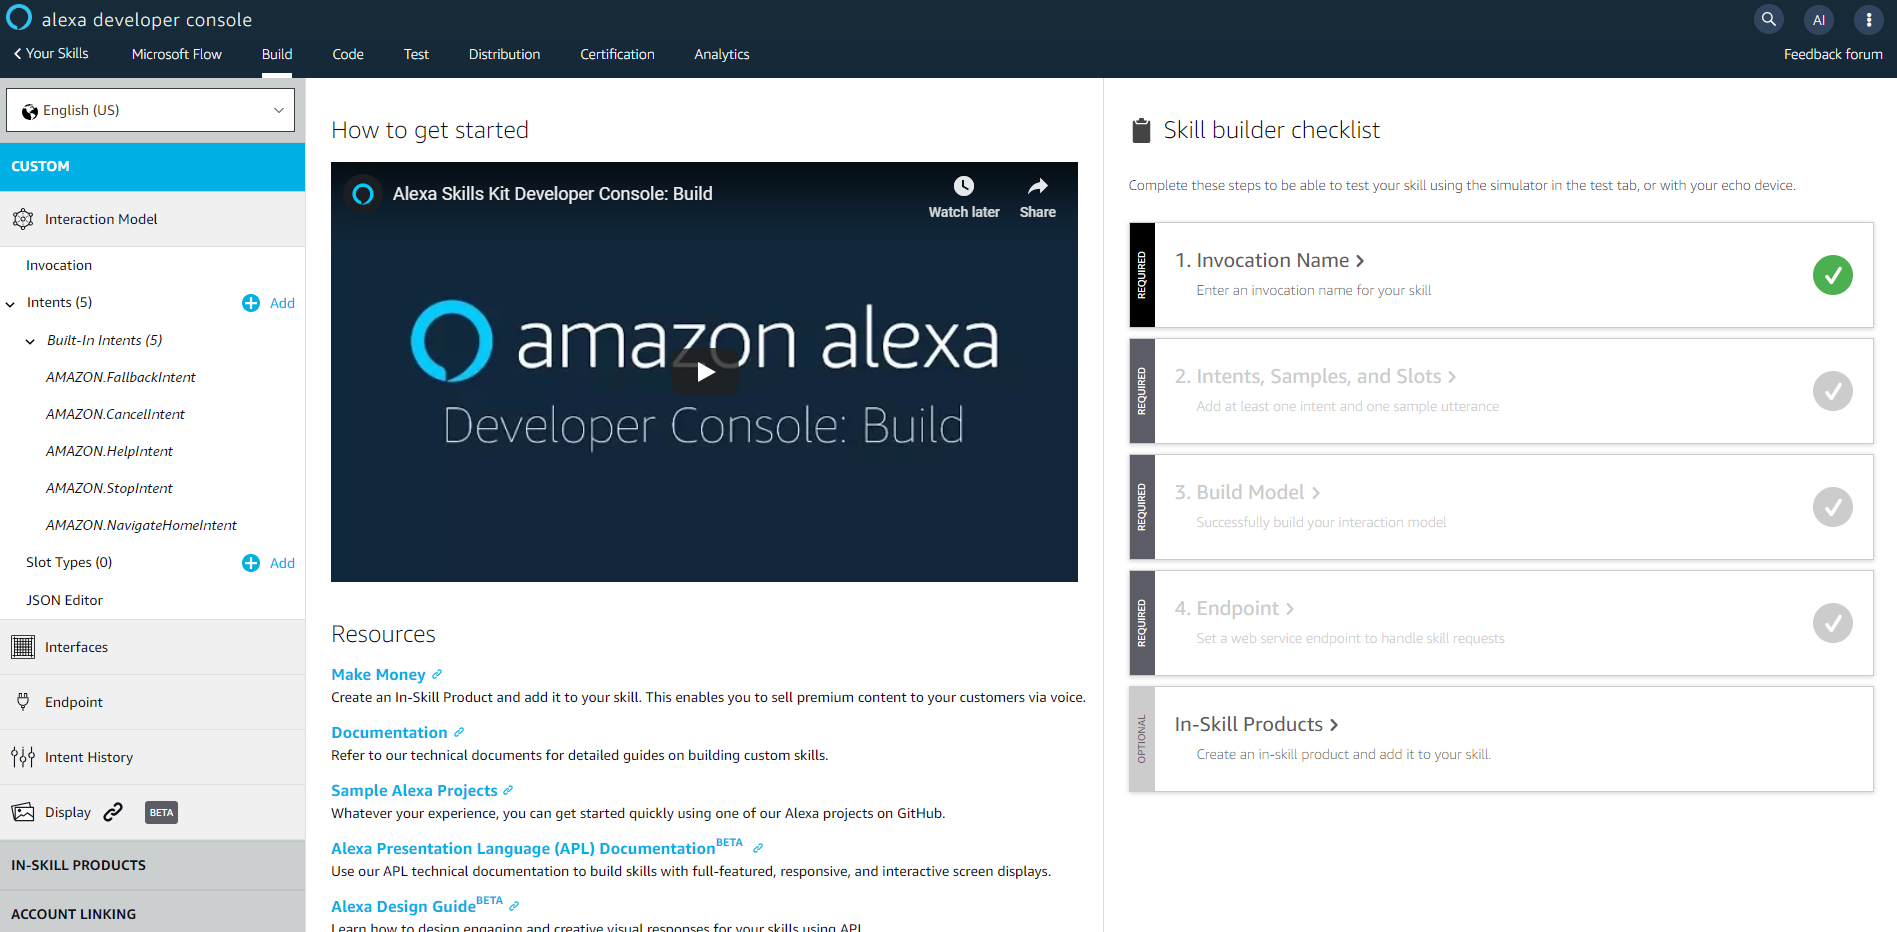
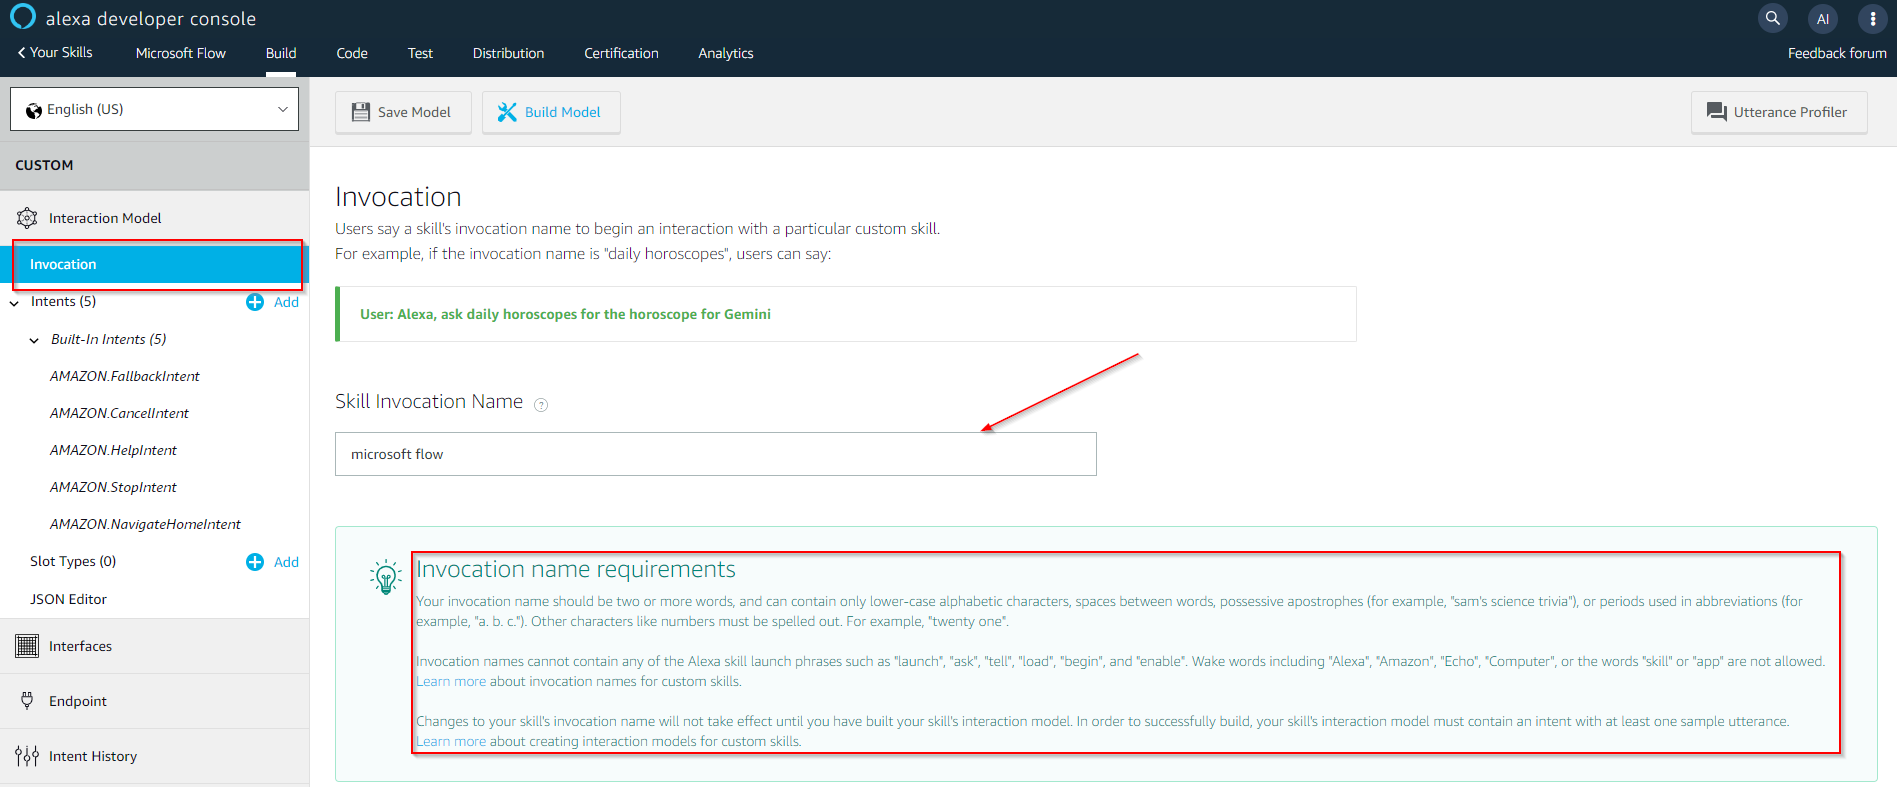
Let’s set the Invocation name first, which will be used to call the skill e.g. - “Alexa, ask Microsoft Flow to .. " . Note: this name can be different from the skill name.
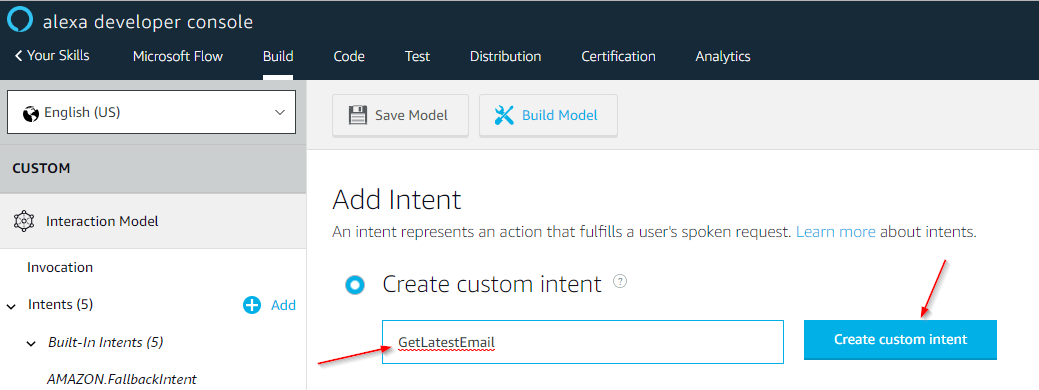
For this blog, I will trigger the Flow to get my last e-mail which will be then sent to Alexa that will read it out to me. So, let’s add an intent for this - “GetLatestEmail”. Click “Add Intent”, then enter the name of the intent and click “Create custom intent”

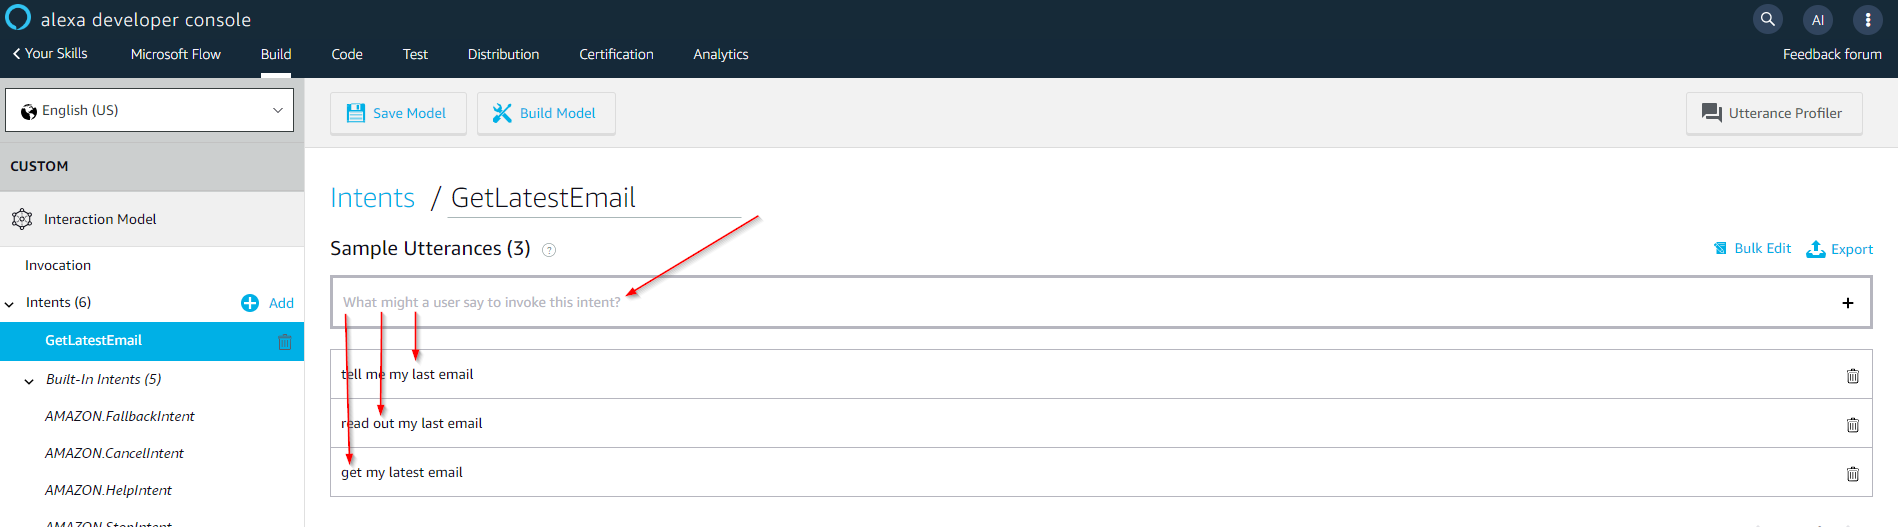
We need to enter some sample utterances that we willbuse to get the last email such as - “get my latest email”, “read out my last email”, “tell me my last email”. This will help Alexa know which intent you are trying to call. So, the complete expression that you will use -
“Alexa, ask Microsoft Flow to read out my last email”
Next, we need to set the “Endpoint” from the menu on the left section and select “HTTPS”. This is where we will paste the URL generated by the HTTP request in Flow (Step 2).
Step 2 : Create a Flow with HTTP request and response
You can download the flow files here and directly import it if you want - https://github.com/thatapiguy/Trigger-Flow-from-Alexa-Microsoft-Flow
Otherwise-
Create a new blank flow. Use the Request trigger - “When an HTTP request is received”. This will be triggered when we invoke the Alexa skill from Step 1.
[gallery type=“rectangular” link=“file” size=“medium” ids=“201,200,199”]
For the “Request Body JSON Schema” - copy and paste the code from here https://gist.github.com/jeffhollan/f94234697ee02e9b5b86a3518ad05ebe . This is how the body in the HTTPS request from Alexa will be formatted. Here’s the code if you want to copy it from here -
{
  "properties": {
    "request": {
      "properties": {
        "inDialog": {
          "type": "boolean"
        },
        "intent": {
          "properties": {
            "name": {
              "type": "string",
              "x-ms-summary": "Intent Name"
            }
          },
          "type": "object"
        },
        "locale": {
          "type": "string"
        },
        "requestId": {
          "type": "string"
        },
        "timestamp": {
          "type": "string"
        },
        "type": {
          "type": "string"
        }
      },
      "type": "object"
    },
    "session": {
      "properties": {
        "application": {
          "properties": {
            "applicationId": {
              "type": "string"
            }
          },
          "type": "object"
        },
        "attributes": {
          "properties": {},
          "type": "object"
        },
        "new": {
          "type": "boolean"
        },
        "sessionId": {
          "type": "string"
        },
        "user": {
          "properties": {
            "userId": {
              "type": "string"
            }
          },
          "type": "object"
        }
      },
      "type": "object"
    },
    "version": {
      "type": "string"
    }
  },
  "type": "object"
}
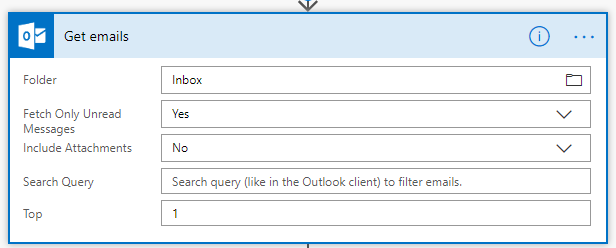
Add an action “Get Emails” (Outlook 365 Connector) to get the latest email. To get the last email, enter the value 1 in the ‘Top’ property.
Now, add the Request “Response” action to send the response back to the Alexa Skill.
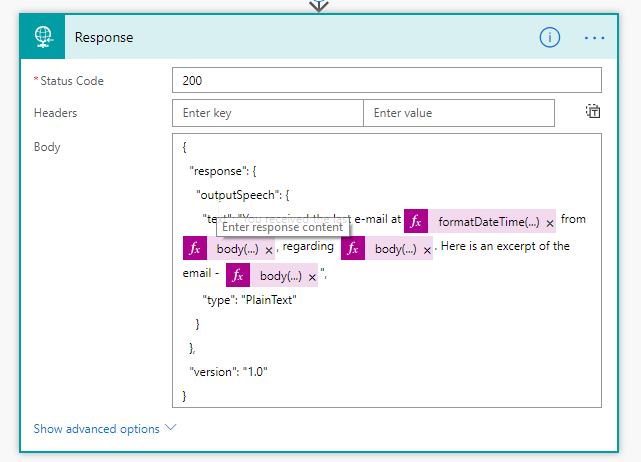
For the body, we will use the below code . You can see that I have used some expressions to read out different details of the email. To test the skill initially, you can just put some random text under “text” :"This is just a test” and once your skill is running fine you can come back and change it to below.
{
  "response": {
    "outputSpeech": {
      "text": "You received the last e-mail at @{formatDateTime(body('Get\_emails')\[0\]\['DateTimeReceived'\],'h m tt')} from @{body('Get\_emails')\[0\]\['From'\]}, regarding  @{body('Get\_emails')\[0\]\['Subject'\]}. Here is an excerpt of the email -  @{body('Get\_emails')\[0\]\['BodyPreview'\]}",
      "type": "PlainText"
    }
  },
  "version": "1.0"
}
The Flow is complete now. Name the Flow something meaningful (this is important, you will realize it when you have more than 50 Flows 😄 ) and hit the “Save” button. This will generate a URL in the HTTP request Trigger. Copy the URL and now let’s complete our Alexa Skill.
Step 3: Complete the Alexa Skill Endpoint details and Build the Skill
Under the Endpoint section, paste the copied URL from Step 2 and paste it in the Default Region. Select the SSL certificate as shown in the image below and click “Save Endpoints”.

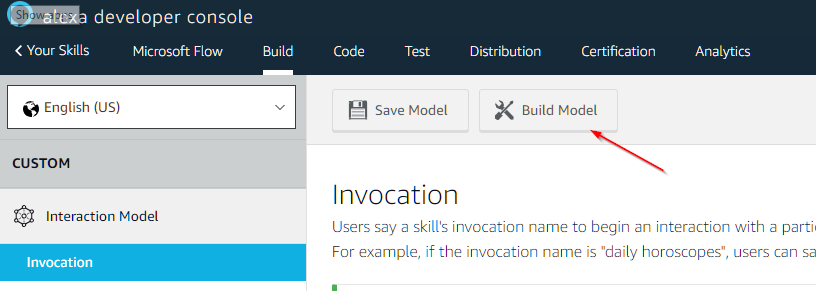
Now, go to the Invocation Section and Click on “Build Model”. It might take some time to build the model the first time. (around 20-30 seconds)
And that’s it! The Skill is built now and ready to be used in Development mode. (You don’t want to share this with anyone because the Flow will use your outlook connection. )
Step 4: Fun time! Let’s Test the skill
The skill should be enabled by default in your Alexa settings.
Time to say the magic words -
Alexa, ask microsoft flow to read out my last email.

This was my exact reaction and hope you enjoy to the same extent.
If you have any questions, please feel free to reach out to me.
I will be doing a live AMA on this topic on Wednesday 6 PM Eastern - https://www.youtube.com/watch?v=K3G3k_Bamqg
Join me to dig deeper on this topic and ask any questions that you have.
Vivek Bavishi aka That API Guy
Blog | Twitter | YouTube | Community Profile | GitHub
Comments:
[…] recently came across a blog post which discussed getting Alexa to work with Microsoft […]
#### [Alexa, Field Service and Me (Part 2) – Linking to Flow – LinkingD365](http://linkd365.home.blog/2019/04/20/alexa-field-service-and-me-part-2-linking-to-flow/ "") -
[…] API Guy had a great post where he links his Alexa to his O365 email account and has Alexa read out his new email. This […]
#### [Alexa, Field Service and Me (Part 2) – Linking to Flow – LinkeD365 Home](https://linked365.blog/2019/04/20/alexa-field-service-and-me-part-2-linking-to-flow/ "") -
[…] API Guy had a great post where he links his Alexa to his O365 email account and has Alexa read out his new email. This […]
#### [Akash Singhal](http://nothing "[email protected]") -
Hi Vivek, I tried your code. But when I use any of below function it is giving error while calling from alexa. @{formatDateTime(body(‘Get_emails’)[0][‘DateTimeReceived’],‘h m tt’)} @{body(‘Get_emails’)[0][‘From’]}, @{body(‘Get_emails’)[0][‘Subject’]} @{body(‘Get_emails’)[0][‘Body Preview’]} But normal text is giving result. I dont understand whats the problem. I am using Get Email V3 since they deprecated the old get mails. Your article really helped to test alexa. Thanks, Akash
#### [Alexa, ask Microsoft Flow to read out my last email – TDG](https://powerplatform.app/archives/alexa-ask-microsoft-flow-to-read-out-my-last-email/ "") -
[…] Blog post to implement this – https://thatapiguy.tech/2019/03/11/alexa-ask-microsoft-flow-to-read-out-my-latest-e-mail/ […]
#### [Vivek]( "[email protected]") -
Hi Vivek, I too facing the same issue that akash has mentioned, would you be able to help please.